In this tutorial we look at a few ways of creating a bootable Windows 10 USB flash drive from an ISO image. Creation of a bootable USB from an Ubuntu Linux 15.10 Desktop ISO is also discussed for comparison. These techniques can be used to create bootable flash drives for many other operating systems.
If you want to install an operating system (OS) on your computer, you can download an ISO image with that OS. A Windows 10 ISO is available from Microsoft at https://www.microsoft.com/en-us/software-download/windows10ISO. If your computer has a DVD drive and DVD burning software, you can just burn the ISO to a DVD and use that to boot your computer. However, many of today’s computers don’t have a DVD drive, but do have a USB one. Creating a bootable USB flash drive is not as straightforward as burning a DVD. We look at three of the possible approaches for doing this on a computer running Mac OS X.
Disclaimer: use the information found in this tutorial at your own risk. Please be careful! It is very easy to ruin your Mac’s operating system if you make a mistake, especially when using the command line!
Method 1: Create Bootable Windows 10 USB With Disk Utility
This may be the easiest way of creating a bootable windows 10 USB from an ISO image in Mac OS X. Unlike the other two methods, this one does not require administrative privileges. Unfortunately, this will not work for Ubuntu: the ISO for Ubuntu 15 Desktop contains a Linux-specific file system that cannot be read by Mac OS X without installing additional software.
Here are the steps:
-
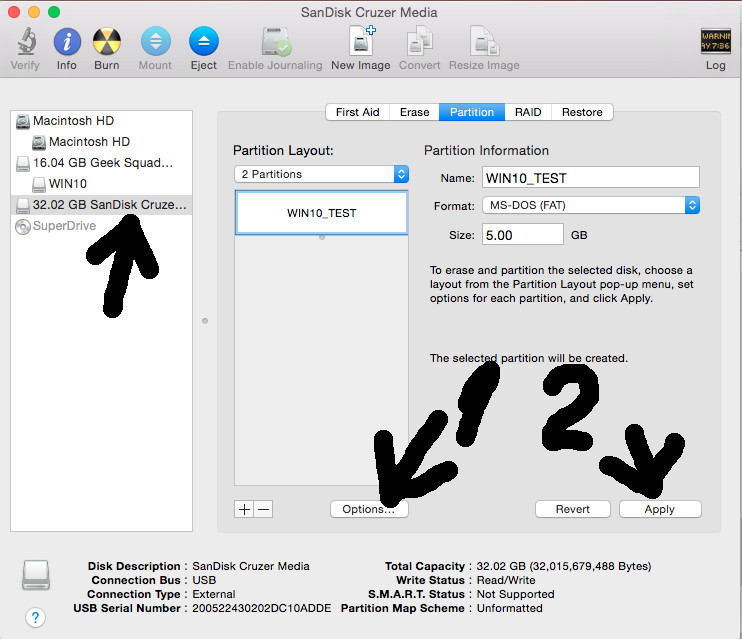
After inserting the USB flash drive, open the Disk Utility found in the Utilities folder under Applications. In this example I use a 32 GB SanDisk Cruzer and create a 5 GB partition on it, called WIN10_TEST:
Using Disk Utility to partition USB stick
Here I use a 2-partition layout, since the ISO is a little over 4 GB, and the rest of the space could be used for something else. I kept it unformatted for now. You can partition the disk as a single partition if desired.
-
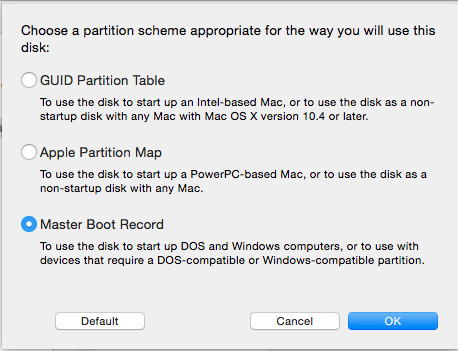
Click on the Options… button and, in the dialog that opens, select the Master Boot Record partition scheme and click OK. Then click Apply, as shown on the picture, and wait for the USB to be formatted.
Set up USB with MBR partition scheme
-
Mount the Windows 10 ISO by selecting File → Open Disk Image… in the Disk Utility. Please make a note of the volume name by which the mounted ISO image is seen in the Finder. It will probably be a long sequence of letters, numbers, underscores, and dashes.
-
For the purposes of this tutorial we will assume that the USB volume is named WIN10_TEST, and the ISO is mounted as volume ISO_WIN10.
Using the Finder, copy all files and folders from ISO_WIN10 to WIN10_TEST.
If you encounter an error, you can use the following command in the Terminal to copy the ISO contents to the USB drive:
cp -R /Volumes/ISO_WIN10/ /Volumes/WIN10_TEST
Please don’t forget the slash (/) after ISO_WIN10!!!
Before running the above command, you may want to make sure that the directories exist. If the first one doesn’t, then the ISO may have been incorrectly mounted. If the second one is missing, then maybe the USB drive was named something else or needs to be taken out and re-inserted. After running the command please make sure that the content of ISO_WIN10 is now also found in WIN10_TEST.
See this post about an error that can occur while copying the ISO contents to a USB flash drive: http://www.dcappdev.com/home-computing/mac-os-x-cannot-copy-windows-10-iso/
Congratulations! You now have a bootable Windows 10 USB that you can use as installation media for a PC. Not sure if you can use it for installation on your Mac, though.
BTW, if you tried this with the Ubuntu 15 Desktop ISO, an attempt to mount the ISO using the Disk Utility would have resulted in the following error message:
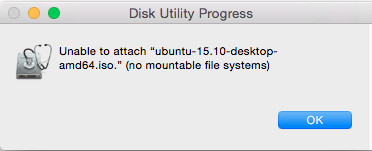
Error mounting Ubuntu 15 ISO
As mentioned earlier, this is because that ISO contains a file system that can’t be read by Mac OS X.
Method 2: Create Bootable Windows 10 USB Using UNetbootin Software
This method can also be used to create an Ubuntu bootable USB. Here we use a piece of software called UNetbootin, which is available for multiple platforms, including Mac OS X.
The steps are:
- Download UNetbootin from its official site, http://unetbootin.github.io/
- Make sure you allow your computer to run apps downloaded from anywhere. This can be done in System Preferences under Security & Privacy. You may want to revert to a more restrictive setting after making your bootable USB.
- Run the UNetbootin app as described on its website mentioned above.
Overall, the tool is fairly intuitive. It’s primarily intended for creating installation USB media for various Linux distributions, but it also has an option to select an ISO file on your computer and make a bootable USB from it. As it turns out, it works just fine with more than Linux, it can be used to create Windows installation media as well.
Method 3. Use the dd Command. Works only with Ubuntu ISO
If you are comfortable using Mac OS X command line (a.k.a. Terminal), you can do the following. You will need to be logged in as the root user for this to work. If you are logged in as a regular user with admin privileges, you can become root by executing
sudo -i
You will be prompted for your password.
This method works only with a Ubuntu ISO, at least with the Ubuntu 15.10 Desktop ISO tested here. That’s because the Ubuntu ISO is a hybrid ISO, which can be used to burn a bootable DVD or can be copied, bit by bit, to a USB flash drive to make that drive bootable. You can read more about this type of image, for example, at http://www.tuxgarage.com/2011/06/ubuntu-switched-to-hybrid-disc-images.html.
So, here are the steps:
- Run
diskutil list
before inserting a USB flash drive and take note of the listing. - Insert a USB drive
- Run
diskutil listagain and make a note of the disk number corresponding to the USB stick. E.g., if /dev/disk2 shows up, which was not there during the first run, then /dev/disk2 is the USB drive. It is very important to know the correct disk number!!! - Unmound the USB by running
diskutil unmountDisk /dev/diskN
where N is the disk number corresponding to the USB. - Run the following:
dd if=/path/to/the/iso of=/dev/rdiskN bs=4m
Please substitute the path to the Ubuntu ISO and the USB disk number in the above command. Please note the r before disk (it’s rdiskN, not diskN). You don’t have to use bs=4m, but that makes the process much, much faster, as it reads and writes in 4 MB chunks You could also try other numbers; I successfully used 1m.
As a side note, a bootable Windows 10 USB created using method 1 or 2 will only be usable for a UEFI boot. It won’t work for legacy boot. For this reason we did not care to make the partition bootable in method 1.
Enjoy!